Another Pattern Release

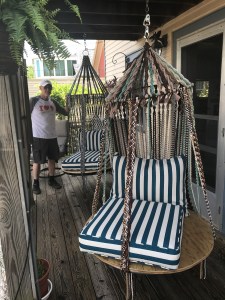
New Macrame Hanging Chairs

Here is a little project to plan during the winter months while we wait for the RV and the snow to melt.

I originally used a combination of the Bird Cage Chair and the Neptune’s Chair patterns from the 1970’s, but I found that when I or anyone sat in the macrame seat, it stretched down and was uncomfortable. That was when I noticed that the girl sitting in Neptune’s Chair had the seat of the chair on a rock; no fair. I wanted something sturdy, versatile and comfortable.

These were modified to have a wood seat to enable a person to sit cross-legged and have other items around you as you relaxed in the summer breeze. You will find this pattern in MacramePurse store in the patterns section. Enjoy.

New Patterns Added

I enjoy making things for myself. So I have decided to help out those who feel the same way.

I have added four new pattern designs to my Etsy Store Front.

There are two great shoulder purses. These purse designs are the best. Once made, they will last a lifetime. The shoulder straps are worked through the entire purse for durability and strength. Easy to maintain; just toss into the clothes washer and air dry. With macrame cord, the colors do not fade, so it keeps its good looks always.

If you are looking for a project to enjoy this summer, then take a peek at the other two pattens added. They are two  versions of the same hanging macrame chair. One I have made for myself and the other I will be working on soon.

I hope one of these patterns will spark a bit of DIY in you.

Enjoy!


Large Hippie Bag

IMG_2009IMG_2011Thank you to Pam from Plant City, FL for allowing me to create the pictured Hippie Bag for her. It is a flat purse design made by knotting the material, then forming it into the purse you wish.

This is a larger version of the one made in June 2012. Three years ago, I made an 8 inch square Hippie Bag  as a replacement for another customer.

This design is knotted using 4mm Ivory macrame cord. It measures 10 inches from top to bottom and side to side, with a strap length of 21 inches from shoulder to the top of the purse. There are 4 wooden beads on the strap, 5 more beads on the outer flap of the purse and the liner is white with three pockets.

IMG_1977IMG_1993After you make the strap, the body knots are added in between. It is then made to the length needed. Fold the material in half for the desired purse size and stitch the sides of the purse with pieces of cord left over to form the body.

Stuff the purse with tissue to get the effect of contents.
IMG_1995Continue knotting rows until you complete the front flap length. Remember to add beads or any other decorations before reaching the end.

The liner is then hand sewn in place. This and other macrame designs made completely with cord, are very easy to maintain. Just remove purse contents and launder. Remove from your machine and gently bring the liner to the outside and it will dry in no time.

Macrame Mini’s

Here is the newest littest macrame purses.

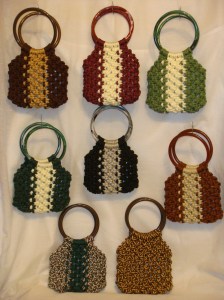
I had a few rings laying around the craft room and decided to put them to good use. These are made with 5″ plastic rings. The rings are a couple of different colors, some with a marble look to them. You can see each one individually and up close in the Gallery.

We have brown/tan, plum/ivory, cactus/ivory, jade/ivory, black/shadow, almond/pearl, smokey/forest and brownie in the color choices. Each one is lined and measures approximately 7″ wide x 6-7″ long.

What do you think? Would you use something this small for a cocktail party, casual or are they better used for a child?

Until the next brainstorm,

Be Creative!

New Macrame Purse

My newest masterpiece.
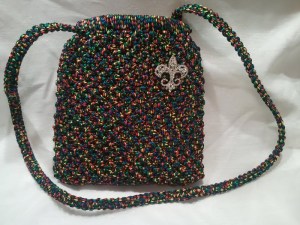
This is an 8″ flex frame made with 4mm Tiffany color cord. Tiffany is a great all purpose cord color. No mater what you wear, it will reflect and pull it from the purse.

I have made the strap around 45 inches from shoulder to purse top for cross shoulder wear.  A fleur-de-lis rhinestone pin is used as an accent; just a little bling. With it being a pin, the owner can switch it out with another pin, depending on the occasion. As you can see the white lining and a pocket is available on each side of the inside.

Tomorrow I may be starting a teal-blended purse for a customer. I will let you know/see the results.

Until then,

Be creative!

Macrame Purse Update

Here is an update to a post of August 9, 2012. I did show a dull version, but since then I found the right add-on for the Forest Green 12″ Flex Frame purse.
This flower is a permanent fixture but a real eye popper. This is one purse that gets attention at a craft show. It is a good size purse with a friendly pattern and strong embellishment.

Let me know your thoughts on this combination?

Macrame-First of the New Ones

Here is the first of many. It is a 12″ Flex Frame Macrame purse.

I have been so busy with life this month that I find my computer and craft room calling to me. It has been two weeks since I’ve posted anything (sounds like confession).

I am sure that everyone planned all their events and summer get-togethers for the month of August just before school starts. No sooner does one weekend end, then the next one fills up. But where I stand right now, every weekend this month is just about full.
I have entered the Riverwalk Craft Fair for August 25, 2012.This is the reason for my concern.
I have started eleven new purses at the end of July and this is the fourth one completed. The first two were Hippie Bags. I will post the third one soon. To clarify things a little more, I work outside my home and pull in the garage about six. Usually I don’t get settled down to crafting until after supper about 7 p.m. during the week. This week, other this have called louder than the craft room.
BUT tomorrow night I will start and continue through Saturday until about four in the afternoon. Yes, I will sleep a bit in there.
Let’s see how far I get. I WILL keep you posted.

Wish me luck.

Macrame Hippie Bag

I am enjoying this design for a couple of reasons.
The first reason is that I was asked to make it for someone. This was a special order from Deanna, who knew exactly what she wanted. This purse measures 8″x8″ with a 45″ shoulder strap length.

Secondly and foremost, the request enabled me to use a macrame method that I came up with myself. I have many idea books, but there is not one that gives direction for this method.

It has the same strength and durability as any other purse, but the construction is different. The idea is to create the material and then construct the object.  Most patterns have you form as you assemble.

In February I featured a tote that was made to use as a diaper/day bag for a new dad. This too is made the same way. The best part about this design is you can make any size purse/tote you need.

For the next couple weeks I plan on putting together many different versions of this design by using 4mm and 6mm cord, varying widths and colors and front flap designs. I am going for the 8″-12″ width and no longer than 10″ length.

Stop in again and see what we’re up to.

As always, be creative.

Macrame Walls

This is so cool, even if I do say so myself.I have had this idea for about 9 months.

I needed a better way to display purses at craft shows and art fairs.
Last year we toted 4’x8’sheets of plastic lattice panels and long pieces of wood to screw them to (see craft show tab). It was great to use hooks on the lattice to hang each purse and be able to move them around as they sold. But I wanted something uniform and befitting the theme of Macrame. I can still use the same hooks, they just sit on top of each square knot for strength.

To this picture, I will be adding one macrame plant hanger, with fake plant, in each corner. This is for a little bit of a joke. Because every craft fair I go to, at least 10 people make fun of them. They will not be for sale, but just as an accent to add to the theme.

There is about 3,700 feet of clothes line for these three panels. You should have seen the man in the check out aisle behind us when we purchased 39-100 foot bundles; we took two back. He had to ask what the heck we were doing. As a matter-of-fact he stopped by the venue to see the finished work as he had promised; he was impressed.
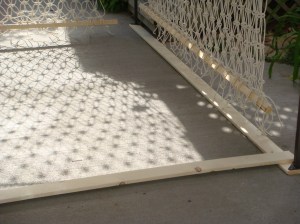
Here is a trick my husband picked up at todays venue for the bottom. He will be bolting the legs to ten foot panels to keep the legs straight and we will loop two tiny bungy straps (one on each side)between the bottom of each wall to the wood frame with eyelet screws (not shown) to keep the panels straight.

I am sending out applications for just two craft fairs this summer and I can not wait to set this up.

Not only does it look nice, but it is very easy to transport. They are held up with a bungy strap on each side at the top and when you are finished with them, just roll them up and put it into the back of the pickup track. The wood boards will be held together with lag bolts and wing nuts; easy to set up and take down. They will fit along side the rolled walls and the pop up tent.

Incidentally, before we took down the walls, I had another idea to use this same pattern for a hammock; just a little shorter width and a little longer length. I’ll get back to you on this; I’m still working out the details. Tell me what you think.

As always, be creative!
New Challenge-Conquered

This was a fun challenge. I found this pattern in one of my macrame books, but the purse was attached to a set of ten inch rings at the top. They were to be used as the shoulder straps. I used to make most of my purse that way back in the day, that does not appeal to me now (if you like rings for a shoulder strap, let me know).

The other thing I have noticed about any pattern that has wooden handles, especially the smaller bags, is when you look inside, the opening is too small. It does not allow easy access to your stuff.

The last part of this challenge was the color. Because I was not going to use a ring or a wooden handle, the cord coming down into the body of the purse needed to be the same as the intended body color. A square knot consists of two cords folded in half. For a shoulder strap, you take 4 cords and lay them out flat, two longer ones on the outside and two shorter on the inside. In this case, I cut all 4 cords, two black on the outside and two brown to the inside,  what  the longer length would be in a regular pattern, laying them evenly next to each other and made a row of square knots 16″ long starting from the middle. Then unpin and turn it around, switch the brown and black cords positions, outside cords to the inside and continue another 16″.

Now that the strap is complete, there will be two black cords hanging at the bottom of the brown side and visa versa with the black strap side.

Placing the strap in half untwisted, I pinned the last knots to a board and took the black from the brown side and the brown from the black side and pinned them 90 degrees toward the opposite strap bottom leaving about 6″ space between strap bottoms; this will form a D on its back. Now all cords are on the side they should be. The beige cords were then mounted over the 4 cords between the straps and additional brown and black cords to their sides. At this point the body of the purse can be started.

So far these steps have taken care of replacing the rings for straps and the color dilemma. To take care of the narrow problem, a single cord was added to each side for four rows to increase the opening for easy access. To ensure that the contents will not fall out if the purse if it’s dropped, a tab closure is added to the back and slides over the bead in the front to latch. As you can see the inside of the purse is nice and wide when pulled open. I like the daisy pattern on the fabric. This purse has three great pockets for the items you wish to get at right away like your phone or glasses. Let me know your thoughts on this project and share it with others.

As always,

Be Creative