Macrame With Parachute Cord

DSC00208DSC00211

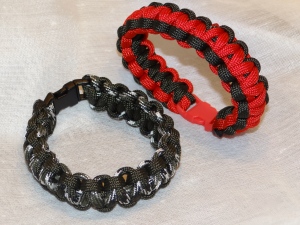
Once in a while a person needs to be able to complete something in a shorter time but with the same amount of satisfaction. Here is definitely something fun and easy.

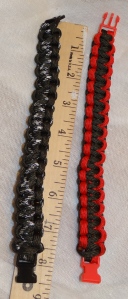
These are parachute cord bracelets. They are great for any age group. The neat thing is that the colors are reversed on the other side. There are two widths and many fun color combinations to choose from. You can make bracelets or necklaces with many different knot patterns and lengths.

I plan on making quite a bit of these, wait and see.

What would be your favorite color or two-tone color combinations.

2012 in review

Thanks for a great 2012!

Looking forward to the next 12 months!

The WordPress.com stats helper monkeys prepared a 2012 annual report for this blog.

Here’s an excerpt:

600 people reached the top of Mt. Everest in 2012. This blog got about 10,000 views in 2012. If every person who reached the top of Mt. Everest viewed this blog, it would have taken 17 years to get that many views.

Click here to see the complete report.

Macrame Milestone

10000hitsThank you for a great year.

I understand that Macrame is not the highest priority topic and I appreciate those who took the time to see what was happening here in my small world of creativity. Looking forward to the next 12 months.

I would like to take this moment to wish everyone a healthy, peaceful and prosperous New Year.

Like Macrame Purse on Facebook


I am asking everyone to Like MacramePurse on Facebook. I know that some of you have all ready done so and I really appreciate this. Share your Like with others.
If you have a Facebook page that you would Like me to share or express my Like, contact me or leave a comment with the link and I will do so.
To find MacramePurse on Facebook, click on the Like Us on Facebook picture and it will take you there.
Thank you for your promote.

New Additions

Over the weekend I have added a few new pages for greater ease of use.

The first is the addition of craft show pictures that were taken in the last two months. I know that the tent pictures pretty much look the same but in a different location.

The second was the simplifying of the Contact page.  This way it should be easier to  make a statement or ask a question. I had originally made it to cover everything.

Now there are two Custom Order pages; one for macrame purse quotes/orders and the other is for crochet market bags.

Here anyone will be able to receive a price quote based on the information filled in. You input specifications of what you would like to see in a macrame purse of your own.  I will send you a price by email including the shipping charge. There is a separate form for crochet market bags made from yarn.

To begin the process, take a peek at the gallery page of purse styles that I have made before. Then click on the available colors tab to choose what you like. Other things to consider; strap length,  flex frame  opening and what size opening frame you would need along with the purse body size.

If you have any questions about this, please Contact me and I would be more than happy to help you.

Thank you.

Macrame Walls

This is so cool, even if I do say so myself.I have had this idea for about 9 months.

I needed a better way to display purses at craft shows and art fairs.
Last year we toted 4’x8’sheets of plastic lattice panels and long pieces of wood to screw them to (see craft show tab). It was great to use hooks on the lattice to hang each purse and be able to move them around as they sold. But I wanted something uniform and befitting the theme of Macrame. I can still use the same hooks, they just sit on top of each square knot for strength.

To this picture, I will be adding one macrame plant hanger, with fake plant, in each corner. This is for a little bit of a joke. Because every craft fair I go to, at least 10 people make fun of them. They will not be for sale, but just as an accent to add to the theme.

There is about 3,700 feet of clothes line for these three panels. You should have seen the man in the check out aisle behind us when we purchased 39-100 foot bundles; we took two back. He had to ask what the heck we were doing. As a matter-of-fact he stopped by the venue to see the finished work as he had promised; he was impressed.

Here is a trick my husband picked up at todays venue for the bottom. He will be bolting the legs to ten foot panels to keep the legs straight and we will loop two tiny bungy straps (one on each side)between the bottom of each wall to the wood frame with eyelet screws (not shown) to keep the panels straight.

I am sending out applications for just two craft fairs this summer and I can not wait to set this up.

Not only does it look nice, but it is very easy to transport. They are held up with a bungy strap on each side at the top and when you are finished with them, just roll them up and put it into the back of the pickup track. The wood boards will be held together with lag bolts and wing nuts; easy to set up and take down. They will fit along side the rolled walls and the pop up tent.

Incidentally, before we took down the walls, I had another idea to use this same pattern for a hammock; just a little shorter width and a little longer length. I’ll get back to you on this; I’m still working out the details. Tell me what you think.

As always, be creative!